I started Cubes Customs Builds as a way to share instructions for my LEGO creations. Check the Cubes Customs Builds website for more pictures and instructions as well as Rebrickable, and check out YouTube for videos of the builds.
The Process
What follows is the general process I use to make high quality building instructions and media for my custom LEGO MOCs. This is not a step by step tutorial, just a flyover view of each step in my process.
The Build
It all starts with building something great out of physical LEGO. At the end of the day the customer is buying instructions for what you have built, so obviously the most important part is to have a genuinely awesome idea with great execution and good techniques. But after you have the physical build, things start getting interesting.
Bricklink Studio
I use the Bricklink Studio desktop application for the digital re-creation and instructions making process. Studio is an application that accesses a huge digital database of nearly every official LEGO part ever made, and makes these parts available as 3D assets withing the application. I use these assets to digitally re-create the build on a computer by dragging and dropping each piece into place. There are other such applications, but I prefer this one.
.jpg)
After re-constructing the build digitally I use Studio's built in instructions making tool to make the PDF step-by-step instructions that I will eventually sell to the customer. The process consists of distributing the digitally re-created pieces throughout sequential steps. You simply drag and drop your pieces in whatever order you think makes most sense for the building process. In the end I export a PDF that looks a lot like an official LEGO building instructions manual.
Once I have the PDF step-by-step instructions I generate a parts list for the build. This will be a big text file (usually .xml or .txt formats) that contains all of the parts I used in the creation, and we can directly upload it to a third party brick buying platform like Bricklink so that when someone buys our build they can use one file to order all of their bricks instead of painstakingly searching for each one (I already did that, which is why they pay me). Not only does this file contain which types of parts (e.g. 2x2 brick vs 1x4 plate), but it also says what color they are, how many of them we want, and what condition we want them to be when we order them (used vs. new).
Anyways, in order to create this file we simply add all of our parts to a list on a Bricklink account, then download the .xml file from there. I also like to include a .txt file for my customers, so after I get the .xml I save a copy as a .txt document.
.jpg)
Making Pictures
After I have the digital build constructed, the PDF file mostly made, and the parts lists, I then make the pictures. Notice how I said make, not photograph. I do not use actual pictures of my physical builds. This is for two reasons: firstly, taking high quality photos requires a large studio setup with expensive lights and a nice camera.
Secondly, creating pictures digitally allows me more flexibility when it comes to my physical builds: because I am not going to be using the actual build I do not need to worry about having the exact colors in my collection. If I need a 2x2 brick in tan but I only physically have one in black, then I can just use the black one and make it tan on the computer. This saves me tons of money and time in waiting for bricks to come in transit, because now instead of having to spend money and wait every time I make a new build, I can simply use my massive pre-existing LEGO collection that I have from when I was a kid. I don't need the pieces to be the right colors, I only need them to be the right shape.
Blender
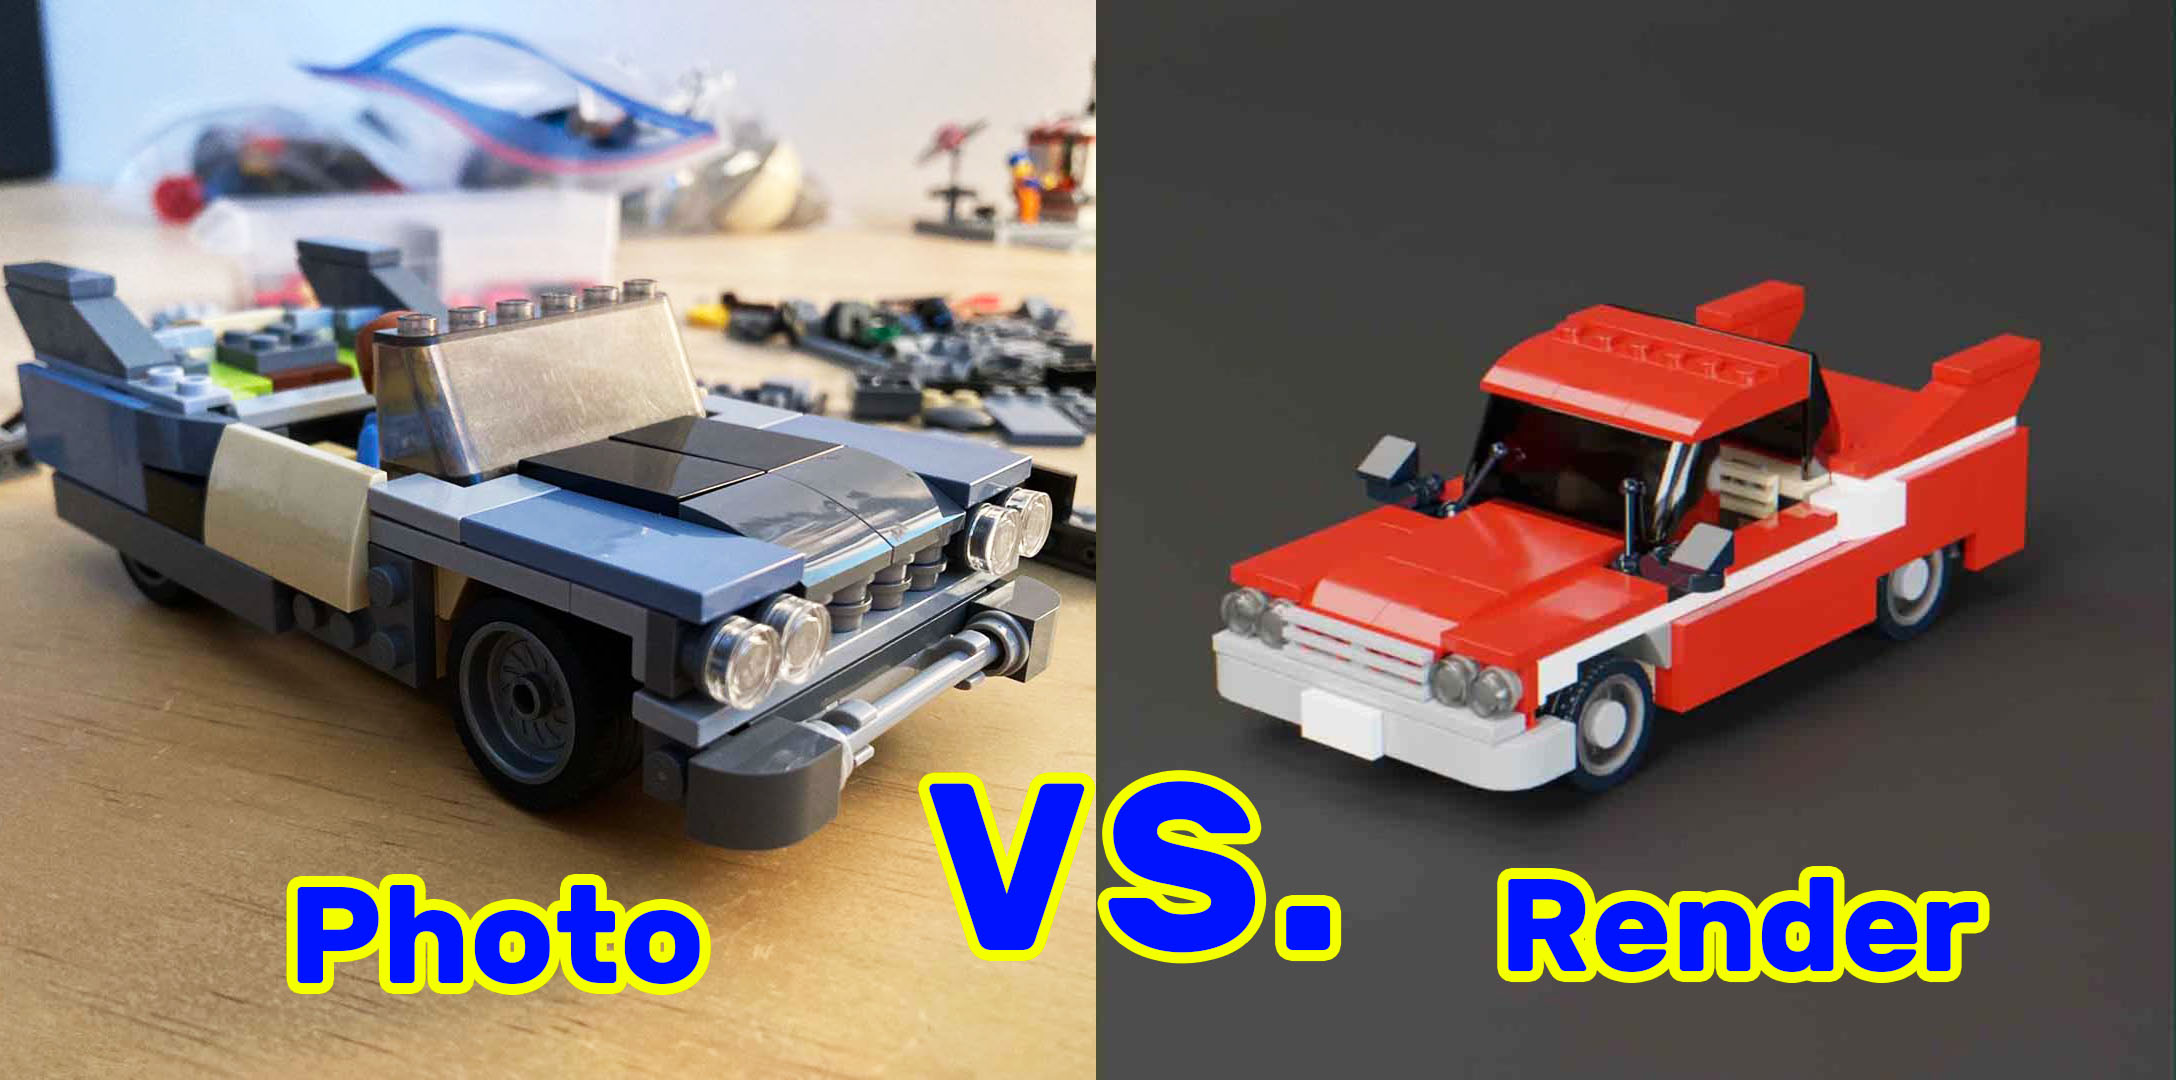
For the actual photo creation, I use Blender. While Studio does have a built in rendering engine, the pictures that come out of it are obviously renders, and everyone knows they are not real pictures. They have that 3D look that anyone who has watched an early 2000s animated movie is only too familiar with. I don't want that, I want photo-realistic media.
So instead I use Blender. Blender is a free and open source 3D modeling and rendering applicaiton. It is crazy powerful, and is capable of producing photo-like media of 3D models. It is quite tricky, but after years of practice I have gotten some good results out of it (I guess you can judges that for yourself).
Using a free addon, I import the .io model of my build from Studio into Blender, position the lights, use an XDR for more lighting, use a custom fabric texture I made a while back, and position the camera. I also double check that all of the colors on the model are correct by going to the Rebrickable.com database and searching for the various colors by name (e.g. light bluish grey), and then copying the RGB values for the color and imputing it into the Hex field in the piece's material shader in blender (e.g. A0A5A9). I also add a custom fingerprint-smudge texture to every piece's roughness map for extra realism.
.jpg)
Because I make multiple builds and render them with basically the same workflow every time, I have a preset Blender file that I use for every build. I store it in a separate folder location, and when I make a new build I make a copy of it and use that for my build. This file has my default backdrop (a curved plane with that fabric texture), three light elements, some compositing settings that help with realism (chromatic aberration, glare and lens distortion), and an HDRi already loaded. However, when I copy this default file and thereby change all the file paths the textures will not load anymore. To fix this I use the Files -> External Data -> Find Missing Files tool, point it in the right folder direction and it generally works. I still usually end up having to manually reset the HDRi though.
Once my .io model is loaded into the Blender set and all the files are in order, I then work on each individual photo by "animating." Once I find a camera angle that I like I press "i" on the keyboard to make a keyframe, and then move one frame forward and repeat this process for what I want my next picture to be. After this I will animate the 3D camera's focal length and depth of field. Once I am ready to export the media I render them as an animation sequence into .png photo files.
.jpg)
Because I know that I will eventually want to have both landscape (16:9) and square (1:1) photos of my build after I am done editing them, I make sure to choose camera angles that are zoomed out enough so that I can make both versions when I crop them later. Also, to accommodate for my eventuall cropage I render out the media at 150% resolution, so that I can still have full HD photos when I zoom in.
Photo Editing
At this point I am done with Blender, but my pictures still don't look quite photo-realistic yet. To take them to the next level I use Adobe Photoshop. By day I am a professional photo editor, so I am familiar with this program. I drag my renders into Photoshop and then correct the colors by using the Levels, Brightness/Contrast, and Vibrance adjustment layers. Once I have a result I like for one of the photos I group the adjustment layers and duplicate the group across the rest of the media, making small adjustments where needed.
.jpg)
Through this color correcting process I have been careful not to crop my media. Once I am happy with the colors I export the set as PSD files to my Desktop using the Files -> Scripts -> Image Processor tool. Now that I have these copies saved I can crop my landscape photos to appropriate demensions. Once I am done with that then I use the Image Processor tool again, but this time I also export them as JPEG files too, and choose a different file location than the first batch. Additionally I make sure to set the "Quality" settings on the export menu to something around 5 or 6. Lowering the media' quality like this will help with its photo realism. But don't push it: using level 2 makes the photos look really realistic, but it also makes them look REALLY bad. I also set the resolution to 1920px x 1080px. After finishing that I have my final landscape photos.
I then close all of the landscape files and click "Don't Save." This is because I have already exported the PSD files along with my JPEGs, so I don't need to worry about saving them again. I then drag in that first set of PSDs from my Desktop. Now I have some nice and zoomed out photos, ready to be made square, but also with the same color grades as my landscape versions. I then make these square with the Image -> Canvas Size. Then they are exported with the same process as the landscape, but with 1080px x 1080px resolution.
.jpg)
Now that I have both landscape and square versions of the photos I can use the square versions for product listings and the landscape ones to make a YouTube video. Before doing that I take a nice square picture and stick it in the front of my PDF. Its a nice touch. Then, after some more tweaks, I export the PDF.
Youtube Video
For the Youtbe video editing process I use Davinci Resolve, the free version. I drag the landscape photos in, pan them back and forth, zoom them in and out, add some text overlays, add some transitions, and use some nice jazzy royalty free music.
.jpg)
Then for the thumbnail I use one of the original un-cropped color-graded PSD files from my desktop, add some text, use some masks to make it look like the build is in front of the text, and viola. Then I delete the desktop PSD folder.
Publishing
Now for the part where I share the instructions and pictures with the world. I use two channels for this: my own Wordpress website and Rebrickable. For each it is almost as simple as uploading the photos and files, writing the description and submitting/publishing. For Rebrickable I simply add the .io file when it asks for my parts list, but for Wordpress I upload my .xml and .txt files in a zipped folder along with my PDF instructions so that the customer only has to download one file with the purchase, which they can then extract upon download.
.jpg)
Only after I have my listings up do I publish the Youtube video. That way I can link to the website and Rebrickable in the video's description, which is the whole point of making the video.
Once people start commenting on my stuff I try to respond back. The algorithm likes it a lot when you engage.
Conclusion
Then I rinse and repeat for my other builds. I hope you enjoyed this overview of the process! If you liked what you saw of my builds then please go on over to Cubes Customs Builds to shop my custom LEGO building instructions (there are some free ones too!), and subscribe on YouTube! It helps a lot. I make a new build about once a week, so there is always new stuff. Thanks!
-January 2025